
 If you are facing this problem more frequently, even if you have a decent net speed then you need to change your DNS settings. Here we are going to tell some method to get rid of this problem. You can fix this problem by changing your DNS to Google public DNS. Before we move on, we would like to debrief you on an acronym which is called DNS.
What is DNS
DNS is stands for Domain Name System and our systems are able to communicate to the web via DNS servers. By default ISP’s (Internet Service Provider) fix DNS servers for their users. However sometimes these servers may fail and you start seeing the error message DNS look up failed even if you have the connection established. For example if you type www.google.com in your browser or even want to go 74.125.239.41 you will redirect to Google home page.
How to Fix DNS Failure?
You can ask your ISP to rectify the problem or try to use others Open source DNS service like Google Public DNS. The boss of internet Google has introduced public DNS. You need to change the DNS address of your existing connection. But before changing your DNS address firstly you have to ensure that your ISP supports Google Public DNS. If they support Google Public DNS then you can enjoy the features of good speed and increase your security features.
Why should you use Google Public DNS?
According to the developers of Google Public DNS, there are three major benefits of using Google Public DNS.
- Speed up your browsing experience.
- You can improve your security.
- Get the results you expect with absolutely no redirection.
Also Check: How to increases download speed of µTorrent?
How to use Google DNS
To change your DNS setting to Google DNS setting for better and increased browsing speed you need to follow the below steps.
- Go to Control Panel.
- Navigate Network and Internet > Network and Sharing Center.
- Now chose connection from which you want to configure Google Public DNS. Right Click on connection and click on the properties and switch to Networking.
- Now Click on IPv4 or IPv6 (depends on the internet protocol you are using) and click on properties.
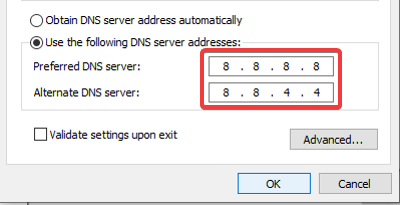
- Click the button with Use the following DNS server addresses and set the following DNS server settings.
For IPv4:
-
-
- Preferred DNS Server – 8.8.8.8
-
-
-
- Alternate DNS Server – 8.8.4.4
-
For IPv6:
-
-
- Preferred DNS Server – 2001:4860:4860:8888
-
-
-
- Alternate DNS Server – 2001:4860:4860:8844
-
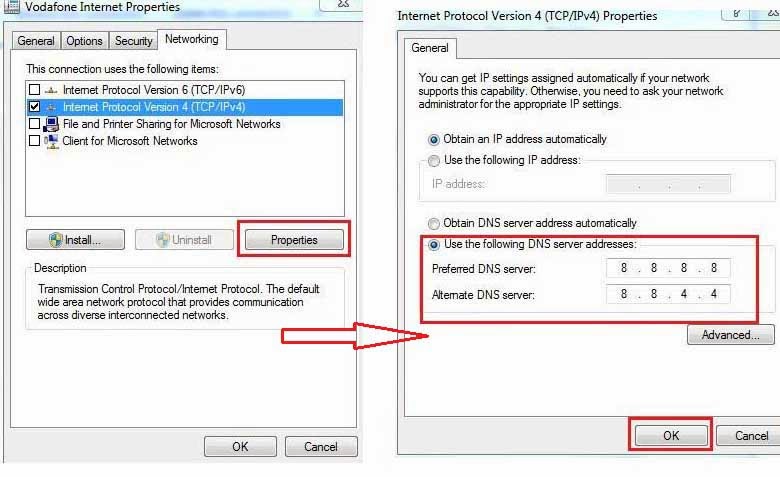
- Restart the connection which are you selected.
Also Read : How to increases Firefox browsing speed?
Test your DNS Settings
Before we leave you to start making the necessary changes on your own, you will have to check if your new settings work or not.
- Open Commend prompt and paste the below code and then press enter.
- nslookup -debug www.tricksforums.com. 8.8.8.8
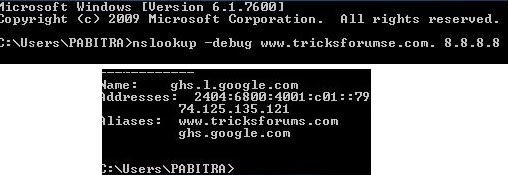
- After that If you get the similar result as shown above then the DNS change is successful, if not then get back to your original settings.
That’s all. If you have any doubts fell free to ask.


Good post…it really helped me to improve my internet speed.The tips seem to work